Is It Easy to Transport a Diy Water Filter
Commercial water filters can be quite expensive. Nonetheless, it's important to have one at home.
And a good option is a DIY water filter that's easy to make with the raw materials that are already accessible to you.
In this article, we've rounded up the top 7 homemade DIY water filters you can DIY easily and are effective in producing potable drinking water.
How to Make a Homemade Water Filter: 7 DIY Easy Projects
1. DIY coffee filter water filter
In this DIY project, we're going to make a water filter using recycled simple materials (most of them are sitting somewhere in your house). First, we're going to gather our supplies;
Here are the different materials we'll need for this project;
- Clear plastic bottle
- Knife or scissors
- 2 glass jars
- Coffee filter, cotton balls, or small clean cloth
- Fine sand
- Gravel or rocks
- Hammer and nail
- Activated charcoal
- Dirty water
You can get fine sand, small pebbles, and activated charcoal (activated carbon) at your local home improvement store.
Now follow me as we DIY easily our water filter.
- Cut out an inch of the bottom of your plastic bottle with your knife or scissors. This is the part without a cap/lid.
- Remove the lid from the bottle and use your hammer and nail to puncture a hole through the middle of the cap. This is very important in making an effective filter.
- Then place the coffee filter or cloth over the bottle and hold it in place by tightly covering it with your punctured cap. If you're going to use cotton balls, you'll have to insert the cotton balls (1 – 2 inches thick) through the end that you cut open to the mouth of the bottle as your first layer. This system also works for the coffee filter and cloth.
- Turn the bottle upside down and place it in the glass jar such that the capped end is submerged in the jar. A cup or mug will suffice when a jar isn't available.
- Next up, we'll add between half an inch or an inch of activated charcoal as the second layer. However, this will be your first layer if you put your coffee filter over the bottle's mouth. Make sure the pieces of charcoal are small. If not, you'll have to break them into the size of a pea.
- Also, add an inch of your fine sand as the third layer over the charcoal layer. Your bottle should be about half full now. If you can also get coarse sand, you can pour this into the bottle before the fine sand. This way, your water will be cleaner as it'll have more layers to pass through.
- Then add at least an inch of gravel as your final layer. Ensure you don't fill the plastic all the way up. Allow a space of around an inch between the pebbles and the cut part of the bottle.
You've just made your homemade DIY water purifier. And to test if your hands-on experiment can really filter dirty water, pour dirty water into your homemade water filter and see if it drips clean into your glass jar.
Note that you'll have to repeat the filtering process a couple more times (maybe 2 or 3) before you can get really clean water.
Learn to increase your shower water pressure.
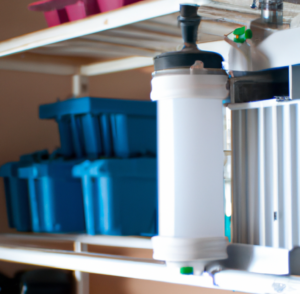
2. Bio water filter
A bio water filter is a great way to make a homemade water filter that'll purify your water and make it good for drinking. And it goes a step further.
The biofilter also rids your water of the most harmful bacteria and pathogens so you can have safe and healthy water. And it's also a good alternative to splurging on commercial filters; you can DIY easily a water filtration system that can cater to the water needs of your whole house.
Here are the different materials you'll need for this DIY filter project.;
- Gravel
- Sand
- Activated charcoal
- Some fiberglass screen
- Plastic plumbing fittings
- 3 food-grade five-gallon buckets
- Hole saw
Let's embark on this easy project and build an effective filter.
- Stretch a fiberglass screen over the plumbing fitting that'll go inside the buckets. And secure the screen in place with an O-ring, rubber band, or glue.
- Use your hole saw to cut a center hole at the bottom (base) of two buckets. The hole should just be wide enough for the threaded part of the fitting to go through.
- Then cut the same size hole at the side – a few inches above the bottom – of the third bucket.
- You can now attach the fittings through the side and bottom of the buckets in the way that the screened portion will face up. Then seal the screens with an O-ring.
- Attach a valve or flexible tube to the third bucket with the side plumbing fitting to allow the filtered water to flow into a pitcher or container.
- On the center of two lids, cut a hole each that is slightly larger than the fitting. This is so you can easily stack the buckets.
- Next up, you're going to glue two small plastic covers (cups) to the screened end of the fittings. This is so the weight of the sand and gravel won't make the screen come loose. But before you glue the cover to the screen, you'll have to bore holes on the sides of the cups so water can flow through. Then glue the cup over the fitting upside down.
- We're almost done making our filter. So we'll thoroughly rinse our filter to remove dirt, and silt so we can put our filter materials (sand, gravel, and charcoal) without our water looking cloudy.
- You can now fill 2/3 to 3/4 of each bucket with the materials. You'll put the activated charcoal in the bottom bucket (the one with the side fitting). Then cover it with one of the lids with a center hole and put a bucket that'll carry the sand on top of it.
- Then place the other lid with a center hole over this bucket, and place the last bucket carrying the gravel on top of it. You can use the remaining lid without a hole to cover the gravel bucket, and voila, you've built an effective biofilter.
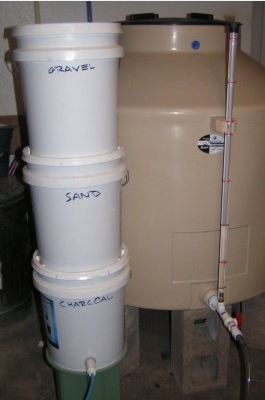
The top bucket needs to be covered so other debris won't get into your water filtration system. Your DIY bio water filter will be able to process a few gallons of clean water a day.
And if you really need drinkable water, you'll have to aerate (add air) the water after the filtration. To do this, pour the water a couple of times back and forth between some of the buckets.
How about we explore a natural DIY water purifier?
3. Solar water disinfection (SODIS) ft. plastic bottle
The solar water filtration system is also one of several ways of making an effective homemade DIY water filter.
It's an easy project and all the materials you need are already available to you. And as you've already guessed, this water filter process uses the sun as one of its raw materials.
However, the drawback is that the SODIS water filter may take a longer time to filter water, depending on the water source, though.
The simple materials you'll need for this DIY water filtration system include:
- Plastic water bottle
- A spot exposed to sunlight
- Tap water
Let's do this simple hands-on experiment.
- Fill your container with water and expose it to direct sunlight.
- Cover the container (water) with a thin screen to avoid more contaminants and impurities entering it.
- Next, we'll leave our water for two hours to purify. But if you're using cloudy water, you may have to leave it for two days or more.
Now you've completed your solar water disinfection project. But the water may not be pure enough for your drinking water, so you'll have to use two filtration methods.
That leads us to the next water filtration method.
4. Boiling your filtered water
There's nothing new about boiling water. The good thing is that it helps further purify the water you've gotten from other purification techniques so you can have potable drinking water. You can also even boil your tap water to further purify it.
Simply boil the water for around a minute or three (depending on the volume). This will kill bacteria and pathogens in the water. Plus it'll also get rid of harmful household chemicals that may have seeped into it.
Then allow the water to cool before storing it. Now, you've got contaminant-free water that you can drink.
5. Make Swamp Water drinkable
Now, if you find yourself in a survival situation, knowing the swamp water filtering system will prove to be an invaluable skill to have up your sleeve.
With this technique, you'll be able to transform dirty water infested with flies, mosquito larvae, algae, and large debris into safe drinkable water.
And the interesting thing is that water filters like this are super easy to do. Let's dive right in.
- Make your DIY water filter using the steps we outlined in the first filtering system using charcoal, pebbles, and fine sand.
- Fetch a jar of dirty or pond water from a nearby house.
- Let the water sit for around an hour so some of the dirt can settle at the bottom and make the water become clearer.
- Then transfer the clearer part of the water to a new glass jar; leaving the sediment and other impurities in the older jar.
- Pour this clearer water into your filter and leave for around 30 minutes to 1 hour for the filtering process.
- You can now see that your water is clear. However, it isn't safe for drinking. So we'll sterilize it using the boiling water method. You could either boil or put it in a microwave for 3 – 5 minutes. Or you could use the solar water filtering system but this will take a longer time.
Now you know how to make dirty water good for drinking.
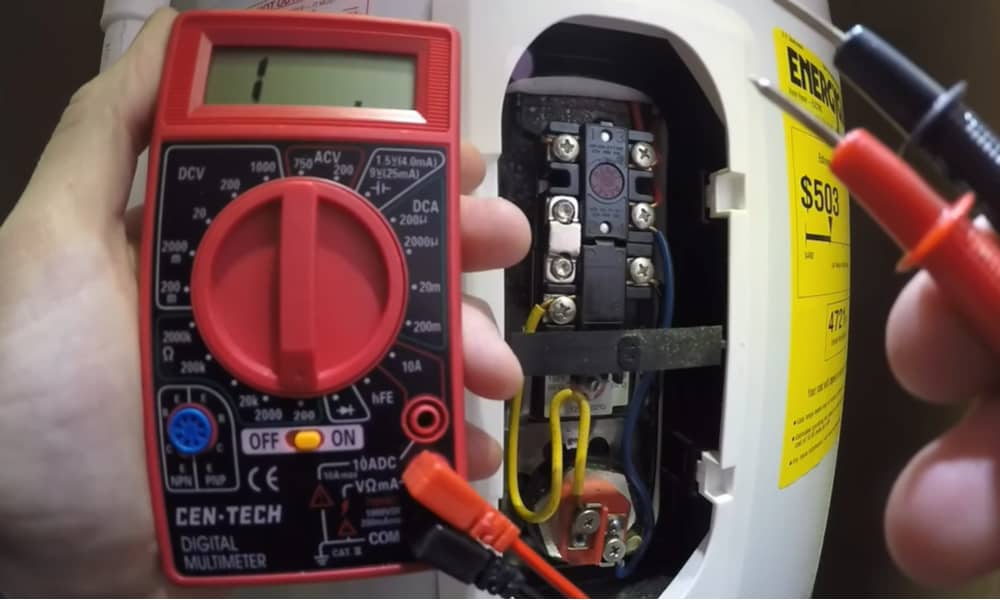
Learn to test and troubleshoot your electric water heater thermostat by yourself.
6. Two-stage DIY water filtration system
The two-stage DIY water filter is another great for purifying water up to 99%. But keep in mind that this homemade water filter doesn't remove some chemicals and salt from salty water.
The house water filter system method uses carbon filtration and distillation to remove bad taste, color, odor, impurities, and biological contaminants such as parasites, bacteria, and viruses. And it can serve as your water heater and stove burner at the same time.
It's also very easy to do as we'll have created our basic filter as described in the first method, and use a heated coil to purify the water.
Watch this short video to learn more about the filtering method for this water filter.
7. Filtered water made from a tree branch
It might interest you to know that you can use the branch of a pine tree to filter 99% of bacteria in water (especiallyE. coli)!
Yeah, pine – sapwood – has porous xylem that can absorb and filter contaminants that are 70 nanometers small. However, it can't filter viruses such as rotaviruses and hepatitis. But after filtering the water, you can boil it so it'll be safe to drink.
Let's do this tree branch water filter experiment (also called xylem filter) that can purify up to four liters of water a day.
Materials you'll need for this DIY water filtration system include;
- Branch of a pine tree
- Soda bottle
- Transparent glass jar
- Knife
Let's get started.
- Cut out 4 inches of a pine branch.
- Peel the bark off the branch so it can fit the neck of your soda bottle. You can also shave the stick with sandpaper if it's too wide.
- Slide an inch of the wood into the neck of the bottle. Make sure it fits tightly.
- Then cut the bottom inch of the bottle before turning the bottle upside down and placing it at the mouth of the jar.
- Pour your water through the bottle so it drains through the stick.
You've just made a DIY xylem filter. Don't allow the stick to dry out as it'll become ineffective.
Why Does Our Water Cycle and Water Filtration System Have in Common?
The water cycle is the earth's natural way of maintaining a balance in our water bodies. The earth also uses the water cycle to purify our water, but our human activities cause our water to become polluted.
What our filtering system does is that it uses a setup like the one our water cycle uses to purify our water.
Why Should I Have a DIY Homemade Water Filtration System?
Healthy water supply
The first reason you need a homemade water filter at home is so you can have potable drinking water that's free from impurities and bacteria.
As it's probably common knowledge that tap water contains heavy metals such as lead, arsenic, copper, mercury, etc., your DIY water filter will get rid of these and save you from having health issues in the near future.
Better tasting water
When you purify your water, you get rid of some of the chemicals in it. Even with an inexpensive water filter this, for some people, makes the water taste better.
Emergency situations
Nobody plans for disasters or survival situations to occur. Unfortunately, they do, and suddenly, people's lives could just depend on a cup of pure water. Knowing about different ways to put together a water purification system can help.
For such reasons, it's good to be able to quickly create a homemade water purifier that can provide one with good drinking water before help comes.
Eco-friendly
When you purify your water with your DIY homemade water filter, you'll probably buy less bottled water. And these plastic wastes are some of the top pollutants in the world.
So now you know different ways to make a water filter, ensure you always boil your water before drinking.
Source: https://kitcheninfinity.com/diy-water-filter-system/
0 Response to "Is It Easy to Transport a Diy Water Filter"
Post a Comment